These Easy Halloween Spiderweb Oreos are a quick no-bake treat made by dipping Oreo cookies in white candy melts and decorating them with dark chocolate spiderwebs. The complete recipe makes about 24 cookies and takes approximately 15–20 minutes to prep, 10–15 minutes to melt and decorate, plus 10–20 minutes for the coating to set.
Every bite has the familiar chocolate-and-cream Oreo crunch beneath a smooth, sweet white coating and a rich semisweet chocolate design. They look impressive on a Halloween dessert table, yet the spiderweb pattern is created with one simple toothpick pull, making these cookies perfect for parties, school treats, bake sales, or an afternoon decorating project with kids.
Jump to RecipeWhy You’ll Love This Recipe

This Halloween Oreo recipe delivers maximum party appeal with very little work. You do not need an oven, a mixer, or special candy-making equipment; a microwave-safe bowl, a fork, a toothpick, and a small piping bag are enough to create the design.
The method is also easy to adjust. Use classic Oreos for a familiar chocolate flavor, or choose another Oreo variety if you want to change the filling or cookie base. The white coating provides a bright canvas, while the dark chocolate lines make each cookie instantly recognizable as a spiderweb.
These treats are especially useful when you need a dessert that can be prepared ahead of a gathering. Once set, the cookies stack neatly in an airtight container and can be arranged on a platter just before serving.
For a party spread with something savory alongside the sweets, pair these cookies with our easy fiesta dip. The creamy, zesty dip gives guests a welcome contrast to the sweet candy-coated Oreos.
Ingredients You’ll Need

The ingredient list is short, but each item has a specific job in the finished design. Use the quantities below for about 24 spiderweb Oreos.
- 24 Oreo cookies: These form the crunchy chocolate base.
- 12 ounces white candy melts or white almond bark: This creates the smooth coating and pale background for the web.
- 4 ounces semisweet or dark chocolate melting wafers: The darker chocolate makes the web easy to see and adds a bittersweet note.
- 1 teaspoon vegetable shortening or coconut oil, optional: Use only if the melted chocolate needs thinning for piping.
- Halloween sprinkles or candy eyes, optional: These add extra color and personality.
White candy melts are convenient because they are formulated for melting and coating. White almond bark also works well when chopped into small pieces before heating. For the dark chocolate, melting wafers are ideal, although semisweet or dark chocolate designed for melting can be used.
Gather parchment or wax paper before you begin. It prevents sticking and makes transferring the finished cookies much easier.
If you are planning a larger Halloween dessert table, our peppermint brownie recipe is another rich, shareable square that can be cut into small party portions.
How to Make It Step-by-Step
Step 1: Line a baking sheet with parchment paper or wax paper. Leave enough space between cookies for decorating, and place the sheet close to the bowls so you can move each dipped Oreo onto it without making a mess.
Step 2: Add the white candy melts or chopped white almond bark to a microwave-safe bowl. Heat in 20–30-second intervals, stirring thoroughly after every interval; stop when the coating is almost smooth, because the remaining warmth will melt the last small pieces.
Step 3: Dip one Oreo into the melted white coating. Turn it gently with a fork until the top, bottom, and sides are covered, then lift it out and tap the fork lightly against the side of the bowl to let excess coating drip away.
Step 4: Slide the coated cookie onto the prepared baking sheet. If a little coating pools around the bottom, leave it in place or gently sweep away the excess with the fork before it begins to set.
Step 5: Melt the dark chocolate wafers in a separate microwave-safe bowl using short intervals and frequent stirring. Transfer the smooth chocolate to a small piping bag, a zip-top bag with a tiny corner snipped off, or a squeeze bottle.
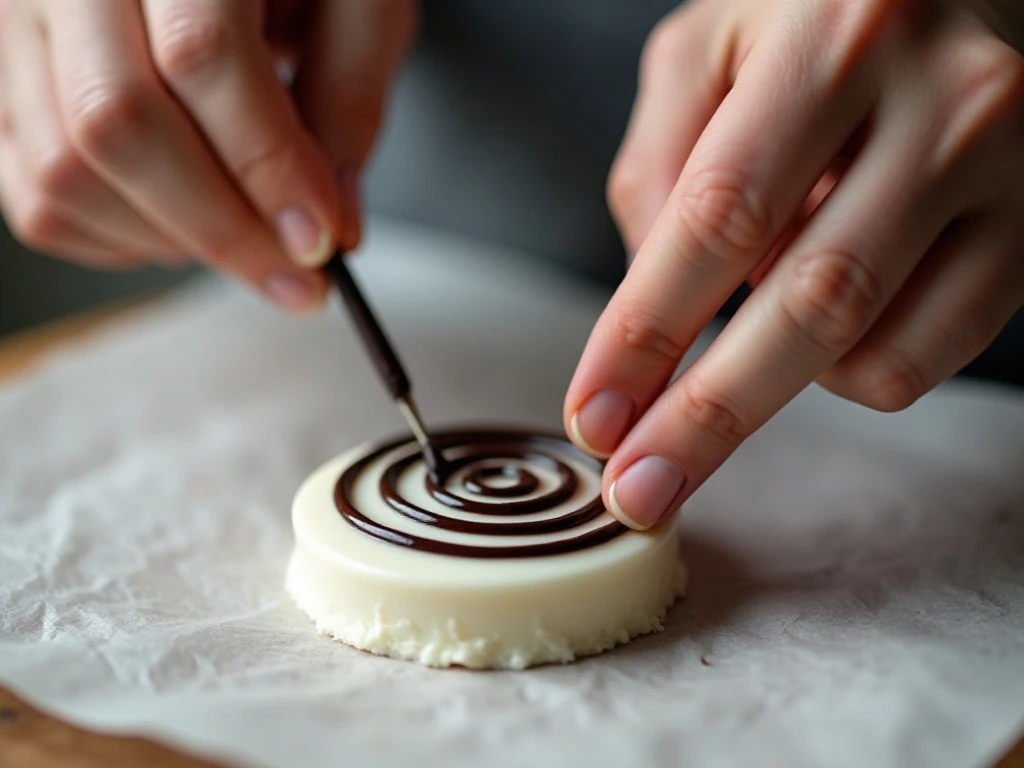
Step 6: Pipe three or four circles on the still-wet white coating. Start near the center and work outward, leaving enough space between circles for the toothpick to create visible web sections; perfect circles are not required.
Step 7: Place the tip of a toothpick in the center of the cookie and pull it straight toward the outer edge. Repeat this motion around the cookie, spacing the pulls evenly to form the familiar spiderweb pattern.
Step 8: Wipe the toothpick between pulls if dark chocolate builds up on the tip. Add Halloween sprinkles or candy eyes before the coating firms so the decorations adhere properly.
Step 9: Allow the cookies to set at room temperature, or refrigerate them for 10–15 minutes until firm. Once hardened, transfer the spiderweb Oreos to an airtight container for storage.
Pro Tips for Perfect Spiderwebs

The most important decorating rule is to work quickly. The dark chocolate must be pulled through the white coating while the surface is still wet; if the white layer sets first, the chocolate will sit on top instead of blending into clean web lines.
Keep the piping chocolate warm but not hot. Chocolate that is too cool becomes thick and difficult to squeeze, while overheated chocolate can become runny and may soften the white coating. If needed, stir in a very small amount of shortening or coconut oil, starting with just a little rather than adding the full teaspoon at once.
Use a small opening for piping. A tiny hole gives you better control and produces delicate lines, while a large opening can create heavy circles that hide the white background.
- Work with one or two cookies at a time if your kitchen is warm and the coating begins setting quickly.
- Do not press hard with the toothpick; a light, steady pull is enough.
- Vary the number and direction of the toothpick pulls for webs that look handmade.
- Keep a clean plate or sheet of parchment nearby for cookies that are ready to set.
For a kid-friendly decorating session, prepare the dipped Oreos first and let children add the circles, toothpick pulls, sprinkles, and candy eyes. The designs do not need to match, and the slight differences make the platter look festive.
For a filling Halloween dinner before dessert, try our Big Mac casserole. Its savory flavors make these sweet spiderweb cookies a fun finishing treat.
Serving Ideas for Halloween Parties

Arrange the finished Oreos on a black, orange, or purple platter to make the white webs stand out. A few Halloween sprinkles scattered around the cookies can frame the display without covering the detailed designs.
For individual servings, place one cookie in a clear treat bag and tie it with orange or black ribbon. These make simple party favors, classroom treats, or small gifts for neighbors.
You can also create a dessert board with spiderweb Oreos, candy corn, mini marshmallows, chocolate pieces, and fruit. Add candy eyes to a few cookies and leave the rest plain for visual variety.
If you prefer a pie-based dessert for the same gathering, serve slices of our easy butterscotch pie beside the cookies. The warm caramel flavor pairs especially well with the dark chocolate decoration.
Storage and Make-Ahead Advice

Let the cookies become fully firm before packing them. Store them in an airtight container at room temperature, placing parchment between layers if you need to stack them.
They can also be chilled briefly to speed up setting, but room-temperature storage is best for serving texture. Keep the container away from heat and direct sunlight so the candy coating remains firm and the decorations stay crisp.
These cookies are convenient to make ahead because the preparation does not depend on last-minute baking. Decorate them earlier in the day, allow them to set completely, and arrange them on the serving platter shortly before guests arrive.
For a festive drink pairing, serve them with Dalgona whipped coffee or a whipped coffee cocktail for adults. The coffee flavor balances the sweetness of the white coating and Oreo filling.

Easy Halloween Spiderweb Oreos
Ingredients
Method
- Line a baking sheet with parchment paper or wax paper and set it near your work area.
- Place the white candy melts or chopped white almond bark in a microwave-safe bowl. Microwave in 20–30-second intervals, stirring thoroughly after each interval, and stop when the coating is nearly smooth so residual heat can finish melting it.
- Dip each Oreo into the white coating, turning it with a fork until completely covered. Lift the cookie out, gently tap the fork against the bowl to remove excess coating, and place the cookie on the lined baking sheet.
- Melt the dark chocolate wafers separately using short microwave intervals and frequent stirring. Transfer the melted chocolate to a small piping bag, a zip-top bag with one corner snipped off, or a squeeze bottle.
- While the white coating is still wet, pipe three or four concentric dark chocolate circles on each cookie. The circles can be slightly uneven; a handmade pattern adds to the spooky charm.
- Immediately drag a toothpick from the center of the cookie toward the outer edge, repeating around the cookie to create the web. Wipe the toothpick between pulls if chocolate begins collecting on it.
- Add Halloween sprinkles or candy eyes while the coating is still soft, if desired. Let the cookies set at room temperature or refrigerate them for 10–15 minutes until firm.
Notes
Final Thoughts
Easy Halloween Spiderweb Oreos are proof that a memorable seasonal dessert does not need complicated techniques. With 24 Oreos, white candy coating, dark melting chocolate, and a toothpick, you can create a full batch of spooky treats in about 35–55 minutes from start to finish.
Keep the white coating wet while you pipe and pull the web, use short heating intervals for smooth chocolate, and let the cookies firm completely before storing them. Once you have the basic method down, you can customize the look with sprinkles, candy eyes, different Oreo flavors, or colorful candy coating for a whole collection of Halloween designs.
Serve them at a party, package them as favors, or make them with children for an easy afternoon activity. However you present them, these crisp, chocolatey, sweet spiderweb cookies are sure to disappear quickly.