This Crispy Bacon Grilled Cheese Roll Ups Recipe turns eight slices of soft white bread, melty American cheese or mild cheddar, and thin-cut bacon into an irresistibly crunchy handheld snack. Each roll-up is flattened, tightly wrapped around cheese, enclosed in bacon, and cooked in a skillet over medium-low to medium heat for about 12–18 minutes.
The result is crisp bacon on every side, golden toasted bread, and warm cheese that melts into the center. These roll-ups are perfect for lunch, game-day snacks, an easy family dinner, or a fun alternative to classic grilled cheese sandwiches, and the full recipe takes about 25–35 minutes from start to finish.
Jump to RecipeWhy You’ll Love This Recipe

There is something especially satisfying about a grilled cheese that can be picked up and dipped. These roll-ups give you the familiar comfort of toasted bread and melted cheese, then add a savory bacon wrapper that becomes crisp as it cooks.
The shape also makes them easy to serve. Cut them in half for a snack platter, or place them whole on a plate with tomato soup, ranch dressing, or a favorite dipping sauce.
They are made with everyday ingredients and require no complicated dough, special equipment, or long prep period. If you enjoy combining cheese with crisp, savory toppings, you may also like our comforting broccoli and cheese casserole for another family-friendly idea.
Ingredients You’ll Need

Soft white sandwich bread is the best foundation because it flattens easily and bends without cracking. Remove the crusts so each slice can roll tightly and cook evenly.
- Bread: Use 8 slices of soft white sandwich bread.
- Cheese: Choose 8 thin slices of American cheese or mild cheddar. American cheese melts especially smoothly, while mild cheddar brings a slightly sharper flavor.
- Bacon: Use 8 thin-cut bacon strips, one for each roll-up.
- Butter: Keep 1–2 tablespoons nearby, but add it only if the bacon does not release enough fat to grease the skillet.
- Toothpicks: These are optional and helpful if a roll-up wants to loosen before the bacon begins to crisp.
Other mild melting cheeses can work as well, including Monterey Jack or mozzarella. Keep the slices thin so the cheese warms before the outside of the bread becomes overly browned.
How to Make It Step-by-Step
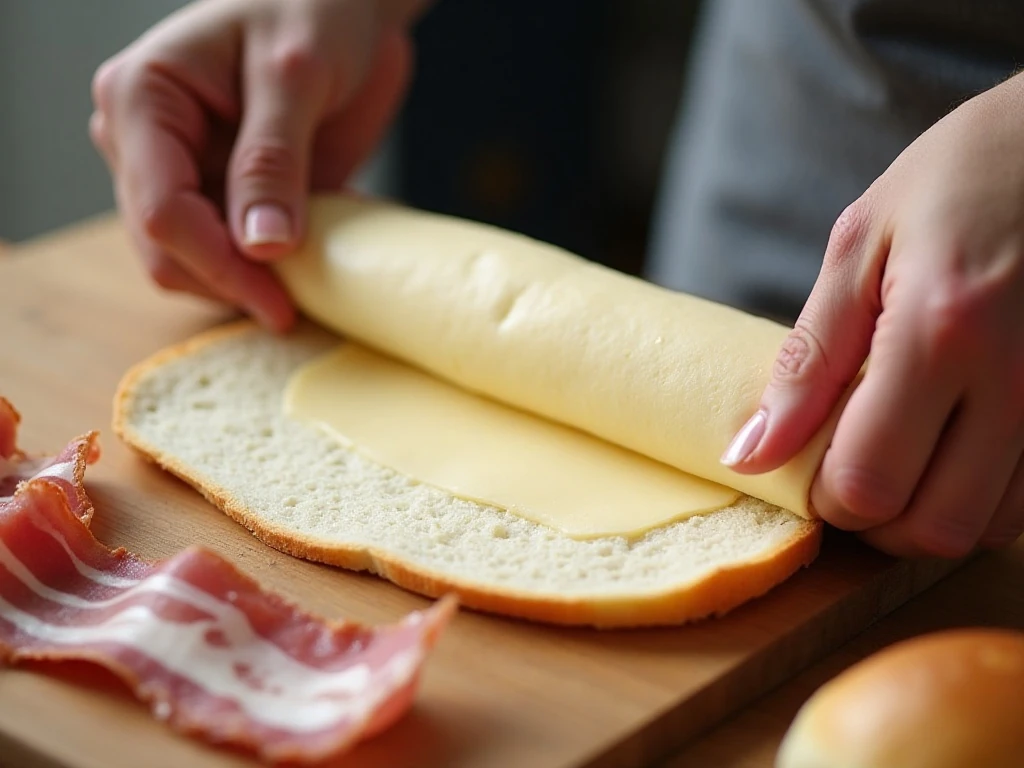
Step 1: Prepare the bread by trimming away every crust. Flatten each slice thoroughly with a rolling pin or the bottom of a glass, working from the center toward the edges so the bread becomes flexible and compact.
Step 2: Lay one cheese slice over each piece of flattened bread. Roll each slice firmly around the cheese, keeping the cylinder snug without tearing the bread, and place it seam-side down while you prepare the remaining rolls.
Step 3: Wrap one thin-cut bacon strip around each bread roll. Try to cover most of the bread without overlapping the bacon too heavily, since an even layer cooks more consistently; use a toothpick when needed to hold the bacon in place.
Step 4: Set a large skillet over medium-low to medium heat. Let it warm gradually, then decide whether butter is needed; bacon will usually provide enough fat, but 1–2 tablespoons of butter can help if the pan looks dry.
Step 5: Arrange the roll-ups seam-side down in the skillet. This first position helps the bacon and bread hold their shape, so leave them undisturbed briefly before beginning to turn them.
Step 6: Continue cooking for about 12–18 minutes, turning the roll-ups frequently so the bacon browns and crisps on all sides. Watch the bread closely, because higher heat can darken it too quickly while the bacon still needs time to cook through.
Step 7: Transfer the finished roll-ups to paper towels and let them drain briefly. Remove every toothpick before serving, then enjoy while the bacon is crisp and the cheese is warm.
Choosing the Best Cheese and Bacon
American cheese is a dependable choice for this recipe because it melts smoothly and stays creamy inside the bread. Mild cheddar is also delicious, especially if you want a little more cheese flavor without overpowering the bacon.
Thin-cut bacon is important for timing. Thick-cut bacon may need longer to become crisp, which can cause the bread to brown too much before the bacon is ready.
If you are planning a larger comfort-food spread, pair these roll-ups with cheesy spinach and tomato stuffed chicken. The same combination of savory fillings and melted cheese makes both recipes especially inviting for a casual dinner.
Pro Tips for Crisp, Golden Roll-Ups

- Flatten thoroughly: Bread that is still thick in the center can split during rolling. A compact slice wraps around the cheese more securely.
- Keep the roll tight: Finish with the seam underneath and use a toothpick if necessary. This helps prevent melted cheese from escaping too soon.
- Start seam-side down: The heat helps set the shape and encourages the bread to toast where it meets the skillet.
- Turn often: Rotate each roll-up every few minutes so the bacon browns on all sides instead of scorching in one place.
- Control the heat: Medium-low to medium heat gives the bacon time to cook while the bread becomes crisp and golden.
- Drain briefly: Paper towels remove excess grease while allowing the outside to stay crunchy.
For the crispest skillet result, avoid crowding the pan. If the roll-ups are packed tightly together, it becomes harder to turn them and less of the bacon touches the hot surface.
Serving Ideas and Dipping Sauces

Serve these bacon grilled cheese roll-ups hot, when the cheese is soft and the bacon has its best crunch. Tomato soup is a natural companion, but they are also excellent with marinara, ranch, barbecue sauce, or a simple bowl of tomato sauce.
For a breakfast-style plate, add fresh fruit and scrambled eggs. You can also serve them alongside a crisp green salad for a quick lunch that feels more complete.
For another cheesy breakfast-friendly idea, try our sausage, egg, and cheese breakfast bites. A sweet finish can come from our blueberry cream cheese pastry, which brings a creamy contrast to the savory meal.
Storage and Reheating
These roll-ups are best immediately after cooking, but leftovers can be refrigerated once completely cooled. Store them in a covered container and reheat gently in a skillet or oven until warmed through.
Avoid overheating, since the bread can become dry and the cheese may leak out. Reheating in a dry skillet helps bring back some of the bacon’s crisp texture better than microwaving alone.
If you want to prepare more than eight, bake a larger batch on a foil-lined rack at approximately 400°F (200°C) for 15–20 minutes, turning once. Skillet cooking generally produces the crispest bacon, while the oven method is useful when making several batches.

Crispy Bacon Grilled Cheese Roll Ups
Ingredients
Method
- Remove the crusts from all eight bread slices. Flatten each slice thoroughly with a rolling pin or the bottom of a glass.
- Place one slice of cheese on each flattened bread slice. Roll the bread tightly around the cheese and finish with the seam underneath.
- Wrap one thin-cut bacon strip around each bread roll. Secure the bacon with a toothpick if necessary.
- Heat a large skillet over medium-low to medium heat. Add a small amount of butter only if the pan is not sufficiently greased by the bacon.
- Place the roll-ups seam-side down in the skillet. Cook, turning frequently, until the bacon is browned and crisp on all sides and the cheese has melted, about 12–18 minutes.
- Drain the roll-ups briefly on paper towels. Remove all toothpicks before serving.
Notes
Final Thoughts
Crispy Bacon Grilled Cheese Roll Ups are a clever way to turn simple bread, cheese, and bacon into a snack everyone will reach for. The key is to flatten the bread well, roll it tightly, choose thin-cut bacon, and cook patiently over medium-low to medium heat.
Serve the roll-ups fresh with your favorite dipping sauce, and remove the toothpicks before they reach the table. For a seasonal dessert to follow this savory treat, our pumpkin roll with cream cheese filling makes a delicious final course.
Once you try the basic version, you can experiment with mild melting cheeses while keeping the same reliable method. Whether served for lunch, a party, or a cozy weekend snack, these golden bacon-wrapped bites deliver crisp edges, gooey centers, and plenty of comforting flavor.