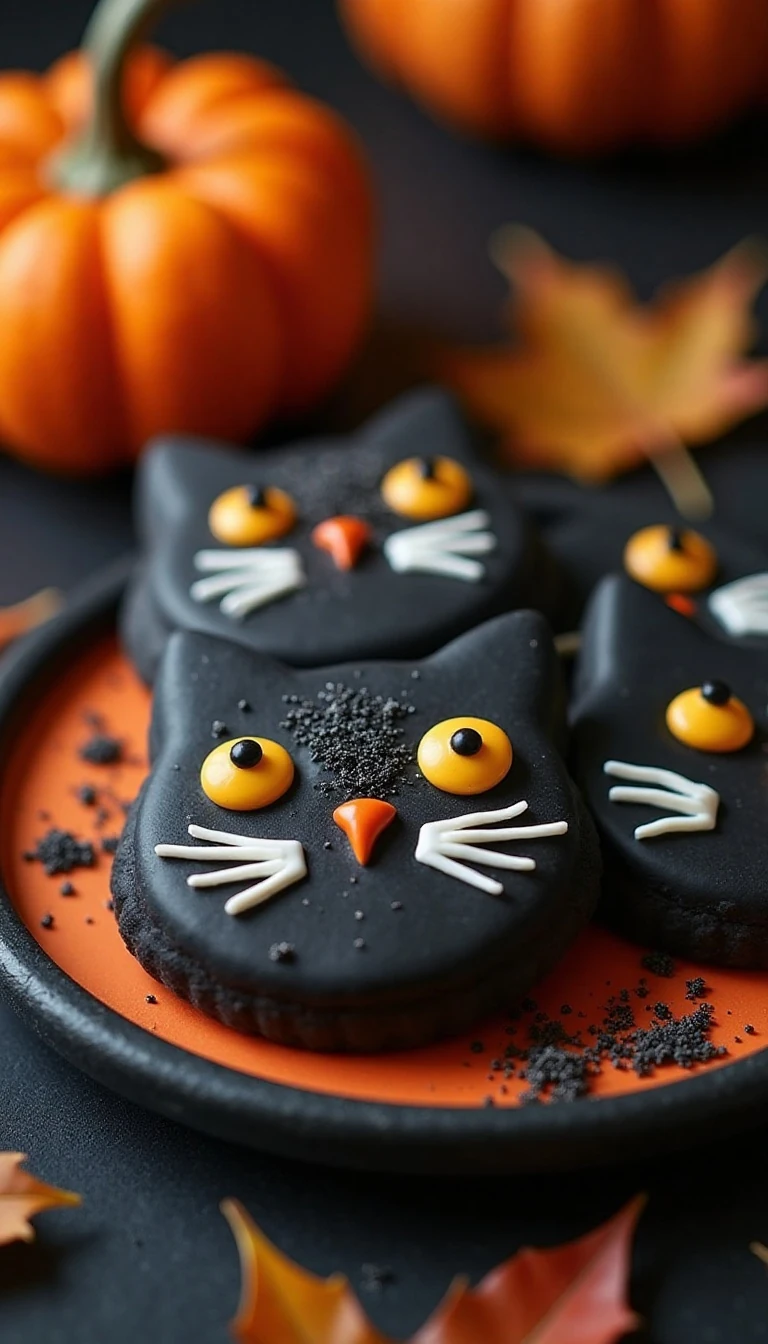
These Easy Black Cat Halloween Cookies are soft, buttery cut-out sugar cookies tinted a deep spooky black and decorated with bright eyes, tiny whiskers, and sweet little cat smiles. The recipe makes about 24 medium cookies, takes 25–35 minutes of hands-on preparation plus 30 minutes of chilling, and bakes at 350°F (175°C) for 8–10 minutes per tray.
Every bite has the classic tender sweetness of a homemade sugar cookie, while the black cat shape makes these treats perfect for Halloween parties, school celebrations, cookie exchanges, or a cozy October baking afternoon. Use candy eyes for the fastest finish, or pipe white and yellow icing details for an expressive batch that looks straight out of a spooky storybook.
Jump to RecipeWhy You’ll Love This Recipe

These cookies bring plenty of Halloween character without requiring advanced decorating skills. The cat cutter creates the recognizable silhouette, and a few simple icing lines transform each shape into a charming black feline.
The dough is sturdy enough for cut-outs but remains pleasantly tender after baking. It has a buttery vanilla flavor that balances the slightly dramatic appearance, making the cookies appealing to children and adults alike.
- Festive and practical: The cookies are ideal for parties, bake sales, lunch boxes, and seasonal dessert tables.
- Easy to customize: Use candy eyes, piped icing, yellow candies, white chocolate, or sprinkles.
- Make-ahead friendly: The dough can be chilled while you prepare baking sheets and decorating supplies.
- Reliable texture: Rolling the dough to ¼ inch keeps the cookies substantial without making them heavy.
For another chocolate-forward cookie idea to add to a Halloween platter, you can also try these rich chocolate pudding cookies. Their deep color and soft centers make a lovely contrast beside the crisp-edged cat shapes.
Ingredients You’ll Need

Start with softened unsalted butter. It should yield gently when pressed, but it should not be melted or greasy, since melted butter can make the dough spread and make the cat ears and tail less defined.
Granulated sugar gives the cookies their familiar sweetness and lightly crisp edges. One large egg binds the dough, while vanilla extract rounds out the buttery flavor.
All-purpose flour, baking powder, and salt create the cookie base. Measure the flour carefully, preferably by weight, or spoon it into measuring cups and level the tops to avoid adding too much.
Black gel food coloring is the best choice for this recipe. Concentrated gel produces a deep shade with much less added moisture than liquid coloring, and the color generally becomes darker after the dough rests.
For decorating, gather 24–48 candy eyes, depending on whether you want one or two eyes per cookie, along with ¼ cup white or yellow decorating icing. Black sanding sugar or chocolate sprinkles are optional and can add a subtle textured finish.
- Have parchment-lined baking sheets ready before rolling.
- Use a cat-shaped cutter with clear ears, paws, and tail details.
- Keep a small amount of flour nearby for the rolling surface.
- Prepare decorating bags, toothpicks, or a fine piping tip for whiskers.
If you are planning a larger autumn dessert spread, these chewy ginger cookies add warm spice and a pleasantly soft texture alongside the vanilla cat cookies.
How to Make It Step-by-Step

Step 1: Beat the softened butter and granulated sugar in a large bowl for about 2–3 minutes. Stop when the mixture looks light, creamy, and fluffy, then beat in the egg and vanilla until the mixture is smooth.
Step 2: In a separate bowl, whisk together the all-purpose flour, baking powder, and salt. Add this mixture gradually to the wet ingredients, mixing only until the flour disappears and a soft dough forms.
Step 3: Add black gel food coloring a little at a time, mixing thoroughly after each addition. Continue until the dough reaches a rich black shade, remembering that the color may deepen while it rests.
Step 4: Divide the dough into two equal portions and flatten each portion into a disk. Wrap the disks and chill them for about 30 minutes, which makes the dough easier to roll and helps prevent spreading.
Step 5: Lightly flour your work surface and roll one dough disk to approximately ¼ inch (6 mm) thick. Cut the cat shapes as close together as possible, then transfer each one carefully to a parchment-lined baking sheet.
Step 6: Check the cut cookies before baking. If the dough feels soft or the ears and tails look floppy, place the baking sheet in the refrigerator for 10–15 minutes so the shapes can firm up.
Step 7: Bake at 350°F (175°C) for 8–10 minutes per tray. Since black dough makes browning difficult to see, rely on the edges looking set rather than waiting for visible golden color, and avoid overbaking.
Step 8: Leave the cookies on the baking sheet for 5 minutes after baking. Transfer them to a wire rack and let them cool completely before decorating, or the icing may soften and slide.
Step 9: Add candy eyes with small dots of icing, or pipe white icing directly onto the cookies. Finish with short white whiskers and a tiny mouth, then use yellow icing or small yellow candy pieces for classic cat eyes.
Decorating Ideas for Spooky Cat Cookies

The simplest design uses two candy eyes and three or four piped whisker lines on each side of the face. A tiny white curve beneath the eyes creates a mouth, while a small yellow dot inside each eye gives the cats an unmistakable Halloween look.
For a polished finish, use royal icing or a fine decorating tip. White melted chocolate also works for whiskers and facial details, though it should be applied only after the cookies have cooled completely.
Black sanding sugar can be sprinkled over the cut dough before baking for a sparkling surface. You can also use chocolate sprinkles to add texture, or leave some cookies plain for a simple matte-black look.
- Friendly cats: Use large candy eyes and a rounded white smile.
- Classic Halloween cats: Add yellow eyes, white whiskers, and a small triangular nose.
- Midnight sparkle: Brush the tops lightly with black sanding sugar before baking.
- Party mix: Make some cats wide-eyed, some winking, and some decorated only with whiskers.
For a quick dessert table with several textures, pair the cookies with sweet pina colada bars. The bright tropical flavor gives guests a cheerful surprise among the darker Halloween decorations.
Pro Tips for Perfect Shapes

Do not skip the first chilling period. Cold dough rolls more cleanly, releases from the cutter more easily, and is less likely to spread in the oven.
Work with one dough disk while leaving the second disk chilled. If scraps become warm or sticky, gather them gently, flatten them, and chill them again before rerolling.
Press the cutter straight down rather than twisting it. Twisting can distort the cat ears, paws, and tail, especially on a detailed cutter.
Gel color is important for both appearance and texture. If the dough is still more charcoal gray than black, let it rest for several hours before adding a large amount of extra color, because the shade usually deepens with time.
Watch the first tray closely because oven temperatures and cookie sizes vary. The edges should be set, while the centers may still look slightly soft; they will continue to firm as the cookies cool.
For a savory meal before dessert, a warm bowl of this easy tortellini soup makes a comforting October dinner. Serve the cookies afterward with milk, coffee, or hot apple cider.
Storage and Serving

Store fully cooled cookies in an airtight container at room temperature. Place parchment between decorated layers so the icing and candy eyes remain neat.
These cookies are especially appealing when served on a dark platter with orange napkins, miniature pumpkins, or a few battery-operated candles nearby. Keep decorations food-safe and avoid placing the cookies directly beside anything that may transfer moisture.
If you are preparing them ahead, bake the cookies and decorate them once cool. Allow icing to set before stacking, and keep the container away from heat or direct sunlight.
For a brunch-style Halloween gathering, you can create a larger sweets table with these cookies alongside bakery-style blueberry muffins. The muffins offer a fruit-filled option for guests who prefer a less candy-focused treat.
Easy Variations
For a faster version, use prepared refrigerated sugar-cookie dough, tint it black, roll it, and cut the cat shapes. Follow the same chilling and baking guidance, checking the package directions while keeping the cat shapes from overbaking.
To make a chocolate-black dough, add 2 tablespoons unsweetened cocoa powder and reduce the flour by 2 tablespoons. This variation gives the cookies a deeper cocoa flavor while helping the finished color look especially dark.
You can also roll the cut cookies in black sanding sugar before baking instead of tinting the dough. For a completely different decoration, use melted white chocolate, royal icing, candy eyes, or small yellow candies for the facial features.
Easy Black Cat Halloween Cookies
Ingredients
Method
- Beat the softened butter and granulated sugar together for 2–3 minutes, until light and creamy. Add the egg and vanilla extract, then beat until evenly combined.
- Whisk the flour, baking powder, and salt in a separate bowl. Add the dry ingredients gradually to the butter mixture, mixing just until a soft dough forms.
- Tint the dough with black gel food coloring, adding it gradually until the desired deep color is reached. Divide the dough into two portions, flatten each into a disk, wrap, and chill for about 30 minutes.
- Roll one dough disk on a lightly floured surface to about ¼ inch (6 mm) thick. Cut cat shapes with a cat-shaped cookie cutter and transfer them to parchment-lined baking sheets.
- If the cut shapes become soft, chill them for 10–15 minutes before baking. Bake at 350°F (175°C) for 8–10 minutes, until the edges are set.
- Cool the cookies on the baking sheet for 5 minutes, then transfer them to a wire rack. Once completely cool, add candy eyes or pipe white icing eyes, whiskers, and mouths, plus yellow details for classic cat eyes.
Notes
Final Thoughts
These Easy Black Cat Halloween Cookies are proof that a festive treat can be both impressive and approachable. The tender vanilla sugar-cookie dough holds its shape beautifully, while simple black coloring and a few bright details create a memorable Halloween dessert.
Give the dough its full chilling time, bake until the edges are set, and wait until the cookies are cool before decorating. Whether your cats look mischievous, sleepy, surprised, or sweet, every one will bring a little edible Halloween magic to the table.